Posts Tagged ‘ Jeans ’

How to DIY a Step Hem

DIY Step Hem Tutorial

Step-hems are everything right now.  

From celebs to fashionistas and street-stylers EVERYONE is trying their hand at this cut, cut, snip style.

You may have spotted a step hem but wasn’t sure what it was called or heard the word tossed around on social media but was at a loss on how to get a piece of this trend.

No worries! I’m breaking it down step by step on exactly what a step hem is and how you can rock this trend with a quick DIY Step Hem Tutorial.

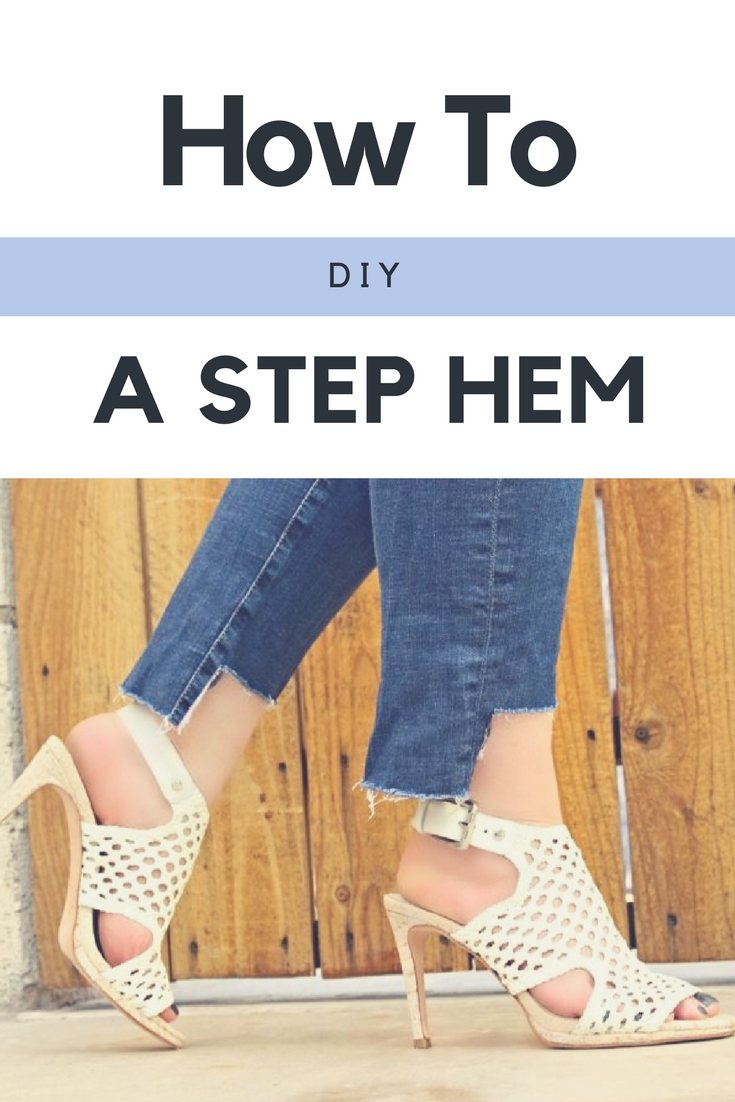
A step hem is a raw hem that is cut higher in the front than the back- Think of them as the mullet of denim cuts.

The best thing about step hems is that you can create one super easily yourself!

DIY Step Hem Tutorial

Here’s What You Need:

  • A Ruler
  • Scissors
  • Pencil or Chalk
  • Jeans

DIY Step Hem Tutorial

Step 1: Mark where you want the longest part of the step hem to land on your jeans- I like it to land right above my ankle. The easiest way is to put your jeans on and mark the length with a dot. After making the initial mark take the jeans off, and use the ruler to draw an even line all the way across where you are going to cut.

Step 2: Cut along the marked line across both the front and back of the jean (at the same time). Make sure you have some sharp scissors!

Step 3: Now measure up about 2 1/2 inches from the bottom of the front of the freshly cut jean and mark it. Do this on both edges just inside the seams.  Then draw a line connecting the two marks.

Step 4: Now, from the bottom cut up the inside of the seams to the mark then across the top and down the other side.  This will make a cut that resembles an upside down U.

Step 5: Repeat the process on other leg.

Step 6: Once your step hems are cut use your fingers to pull a few of the threads out to start the fray the bottom of the jeans and toss them in the washer. Keep in mind that the frayed part will just get better with every wash and wear! If white strings fall down just cut them off (or not..whatever you like!).  DIY distressed hems are all about personalization so however you feel like rockin’ it is cool.  There really isn’t a wrong way.

Stylist Tip:  If this is your first-time customizing a pair of jeans, I recommend practicing on an older pair first until you get the hang of it.

Spring Denim Hem Guide

Denim, it’s my BFF.  Hands down the single most wearable and versatile piece in any wardrobe.

This is an exciting time for denim, fashion girls are going a cut above to make their jeans feel fresh, literally.

It’s not just about incorporating a new silhouette into your rotation, this season it’s time to take your denim game up a notch.  Flared, fitted, or slouchy – this season’s biggest denim trend isn’t about which style of jeans you wear, but how you customize them.

I’m breaking it down this week with a Denim Hem Guide that will allow you- with just a quick measure and cut- to create a hemline that is anything but basic.

Denim Hem Guide

Step-hem jeans are jeans with an asymmetrical hemline and raw edges. The front is cut higher than the back creating a “step” look. This style usually looks better when cut into a cropped length.  Perfect for showing off statement heels!  I have a great tutorial coming up that will walk you through how to DIY a Step-hem in just a couple weeks so stay tuned!

A Raw Hem is so easy and so chic.  No tutorial needed, just take a pair of scissors to your pants and snip off the hems entirely. You’ll get a nice crop, and a nice bit of fray, too.  Keep it above the ankles ladies- like this perfectly cropped pair from TheNomisNiche.  This season its all about cropping to the ankle or higher.

The High-Low hem is just that.  The back is slightly lower than the front.  The drop off is gradual as opposed to a Step Hem where it is evident.  This hemline is great for making your legs look longer and leaner!

Tall girls, this one’s for you. For the most part, DIY-ing denim hems involves cutting at least an inch or more from the bottom of your jeans. And if you’re lucky enough to be long-legged, that might pose a problem. If you’re looking to ADD length to your jeans, use a seam ripper to unroll the hem, which will extend the hem about two inches. Once unrolled, use an iron to straighten it all out. If you are a shorty make sure you buy a short enough inseam to pull this off (at least 2 inches shorter than you want the finished length to be)  This look will give your denim a retro-cool vibe like the pair above from DiverseCityStyle.  It works equally well on wide leg styles, straight leg cuts or bell bottoms!

Fringe Hems are hotter than hot right now.  They are not my personal jam but other bloggers and fashion experts can’t seem to get enough of this Clydesdale Horse-esc finish. This one involves some SERIOUS DIY instruction and Rachel Zoe has a perfect video tutorial to walk you through it.. CLICK HERE to watch.

Which DIY Denim trend will you be rocking this Spring?